🔗 Open WebUI Integration
Overview
Open WebUI v0.6+ supports seamless integration with external tools via the OpenAPI servers — meaning you can easily extend your LLM workflows using custom or community-powered tool servers 🧰.
In this guide, you'll learn how to launch an OpenAPI-compatible tool server and connect it to Open WebUI through the intuitive user interface. Let’s get started! 🚀
Step 1: Launch an OpenAPI Tool Server
To begin, you'll need to start one of the reference tool servers available in the openapi-servers repo. For quick testing, we’ll use the time tool server as an example.
🛠️ Example: Starting the time server locally
git clone https://github.com/open-webui/openapi-servers
cd openapi-servers

# Navigate to the time server
cd servers/time

# Install required dependencies
pip install -r requirements.txt

# Start the server
uvicorn main:app --host 0.0.0.0 --reload
Once running, this will host a local OpenAPI server at http://localhost:8000, which you can point Open WebUI to.

Step 2: Connect Tool Server in Open WebUI
Next, connect your running tool server to Open WebUI:
- Open WebUI in your browser.
- Open ⚙️ Settings.
- Click on ➕ Tools to add a new tool server.
- Enter the URL where your OpenAPI tool server is running (e.g., http://localhost:8000).
- Click "Save".

🧑💻 User Tool Servers vs. 🛠️ Global Tool Servers
There are two ways to register tool servers in Open WebUI:
1. User Tool Servers (added via regular Settings)
- Only accessible to the user who registered the tool server.
- The connection is made directly from the browser (client-side) by the user.
- Perfect for personal workflows or when testing custom/local tools.
2. Global Tool Servers (added via Admin Settings)
Admins can manage shared tool servers available to all or selected users across the entire deployment:
- Go to 🛠️ Admin Settings > Tools.
- Add the tool server URL just as you would in user settings.
- These tools are treated similarly to Open WebUI’s built-in tools.
👉 Optional: Using a Config File with mcpo
If you're running multiple tools through mcpo using a config file, take note:
🧩 Each tool is mounted under its own unique path!
For example, if you’re using memory and time tools simultaneously through mcpo, they’ll each be available at a distinct route:
This means:
- When connecting a tool in Open WebUI, you must enter the full route to that specific tool — do NOT enter just the root URL (http://localhost:8000).
- Add each tool individually in Open WebUI Settings using their respective subpath URLs.
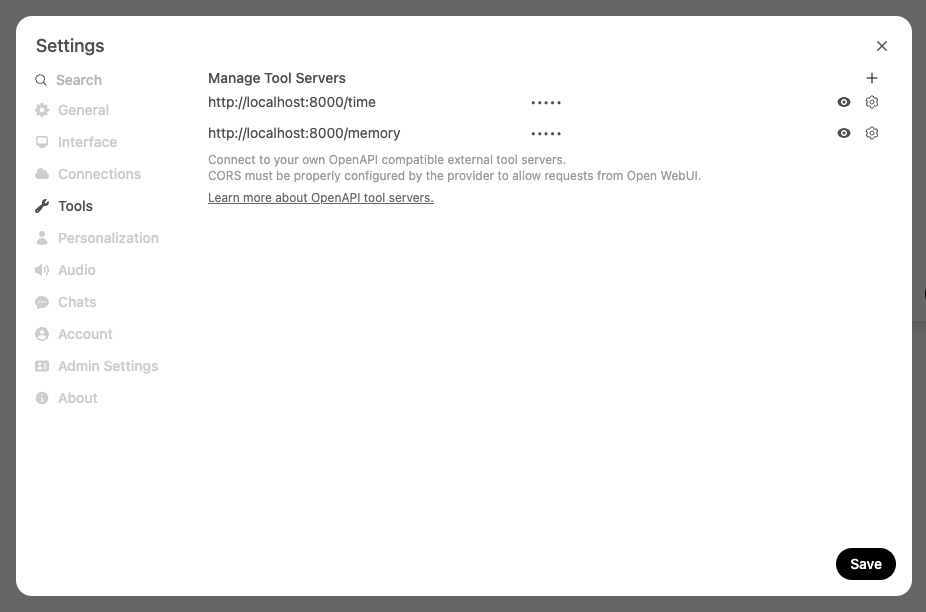
✅ Good:
http://localhost:8000/time
http://localhost:8000/memory
🚫 Not valid:
This ensures Open WebUI recognizes and communicates with each tool server correctly.
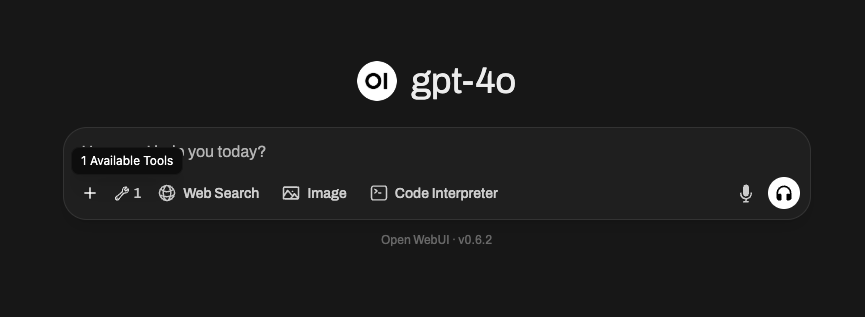
Step 3: Confirm Your Tool Server Is Connected ✅
Once your tool server is successfully connected, Open WebUI will display a 👇 tool server indicator directly in the message input area:
📍 You'll now see this icon below the input box:
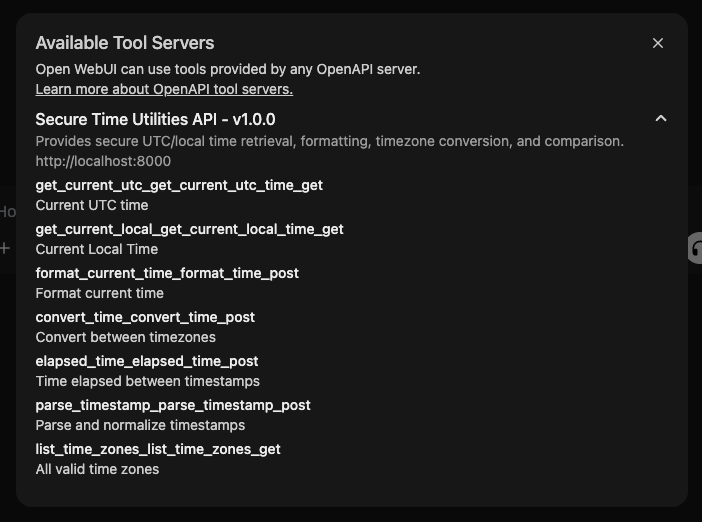
Clicking this icon opens a popup where you can:
- View connected tool server information
- See which tools are available and which server they're provided by
- Debug or disconnect any tool if needed
🔍 Here’s what the tool information modal looks like:
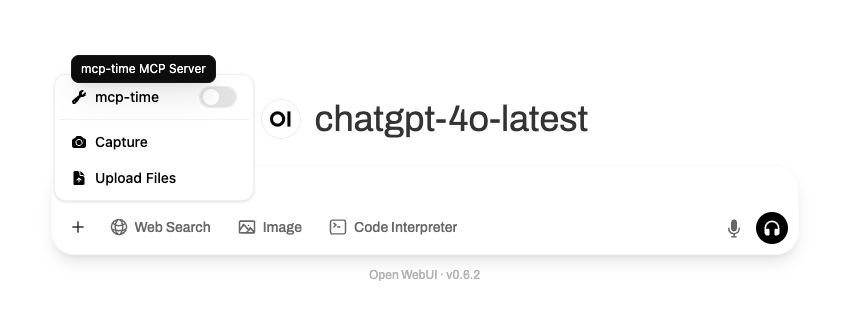
🛠️ Global Tool Servers Look Different — And Are Hidden by Default!
If you've connected a Global Tool Server (i.e., one that’s admin-configured), it will not appear automatically in the input area like user tool servers do.
Instead:
- Global tools are hidden by default and must be explicitly activated per user.
- To enable them, you'll need to click on the ➕ button in the message input area (bottom left of the chat box), and manually toggle on the specific global tool(s) you want to use.
Here�’s what that looks like:
⚠️ Important Notes for Global Tool Servers:
- They will not show up in the tool indicator popup until enabled from the ➕ menu.
- Each global tool must be individually toggled on to become active inside your current chat.
- Once toggled on, they function the same way as user tools.
- Admins can control access to global tools via role-based permissions.
This is ideal for team setups or shared environments, where commonly-used tools (e.g. document search, memory, or web lookup) should be centrally accessible by multiple users.
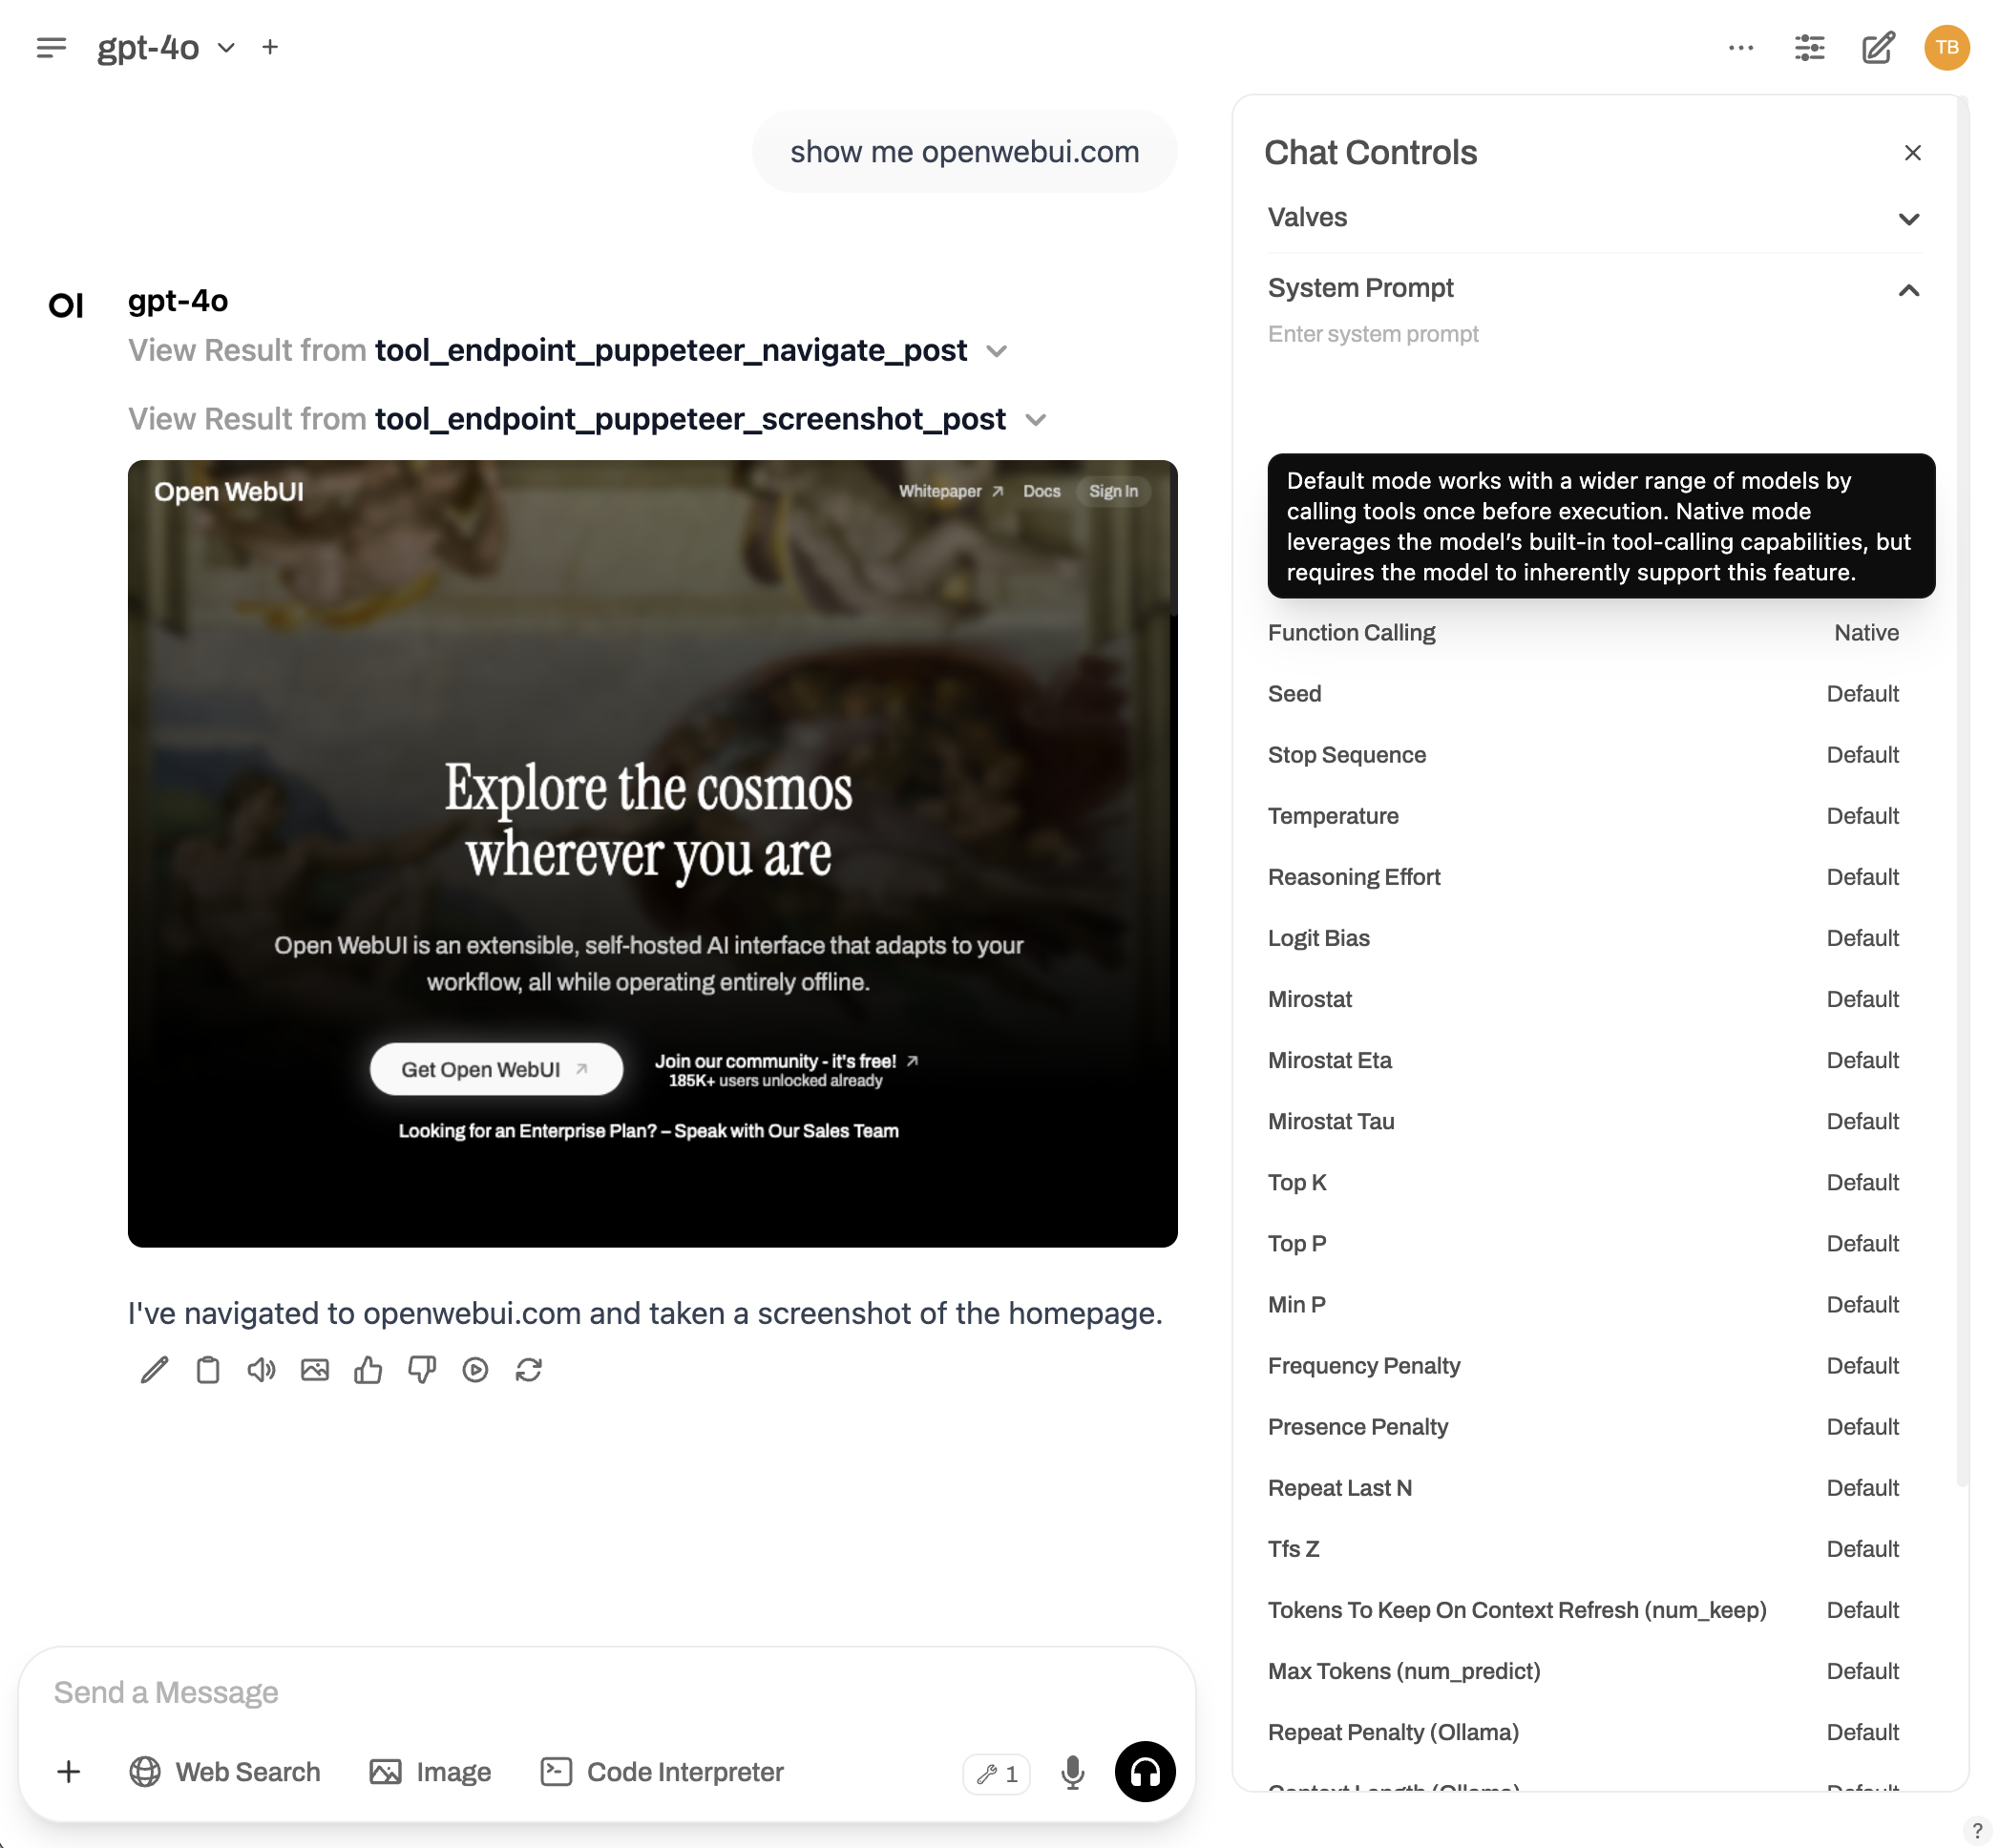
(Optional) Step 4: Use "Native" Function Calling (ReACT-style) Tool Use 🧠
For this to work effectively, your selected model must support native tool calling. Some local models claim support but often produce poor results. We strongly recommend using GPT-4o or another OpenAI model that supports function calling natively for the best experience.
Want to enable ReACT-style (Reasoning + Acting) native function calls directly inside your conversations? You can switch Open WebUI to use native function calling.
✳️ How to enable native function calling:
- Open the chat window.
- Go to ⚙️ Chat Controls > Advanced Params.
- Change the Function Calling parameter from
DefaulttoNative.
Need More Tools? Explore & Expand! 🧱
The openapi-servers repo includes a variety of useful reference servers:
- 📂 Filesystem access
- 🧠 Memory & knowledge graphs
- 🗃️ Git repo browsing
- 🌎 Web search (WIP)
- 🛢️ Database querying (WIP)
You can run any of these in the same way and connect them to Open WebUI by repeating the steps above.
Troubleshooting & Tips 🧩
- ❌ Not connecting? Make sure the URL is correct and accessible from the browser used to run Open WebUI.
- 🔒 If you're using remote servers, check firewalls and HTTPS configs!
- 📝 To make servers persist, consider deploying them in Docker or with system services.
Need help? Visit the 👉 Discussions page or open an issue.